| images | ||
| Modelfiles | ||
| README.md | ||
Install Ollama
curl -fsSL https://ollama.com/install.sh | sh
I prefer to make the model files available for all computers in our working group. Thus I put them on a NAS under /data_1/deepseek.
In that case you want to change /etc/systemd/system/ollama.service and add your directory to it:
Environment= [PATH BLA BLA] "OLLAMA_MODELS=/data_1/deepseek/models" "HOME=/data_1/deepseek"
If you want to access Ollama from a different computer too, you need to add "OLLAMA_HOST=0.0.0.0"
Environment= [PATH BLA BLA] "OLLAMA_MODELS=/data_1/deepseek/models" "HOME=/data_1/deepseek" "OLLAMA_HOST=0.0.0.0"
After that restart systemd with:
systemctl daemon-reload
systemctl enable ollama.service
systemctl restart ollama.service
Check the status of the service:
systemctl status ollama.service
Getting the models
Now we can get the models:
ollama pull deepseek-r1:1.5b
ollama pull deepseek-r1:7b
ollama pull deepseek-r1:8b
ollama pull deepseek-r1:32b
ollama pull deepseek-r1:14b
ollama pull deepseek-r1:70b
However, you want to check first which model you want based on the CPU RAM or the GPU VRAM you have:
ollama list | grep deepseek
deepseek-r1:1.5b                 a42b25d8c10a    1.1 GB
deepseek-r1:671b                 739e1b229ad7    404 GB
deepseek-r1:32b                  38056bbcbb2d    19 GB
deepseek-r1:14b                  ea35dfe18182    9.0 GB
deepseek-r1:7b                   0a8c26691023    4.7 GB
deepseek-r1:70b                  0c1615a8ca32    42 GB
deepseek-r1:8b                   28f8fd6cdc67    4.9 GB
Test
ollama run deepseek-r1:1.5b
>>> Hello
<think>

</think>

Hello! How can I assist you today? 😊

>>> /bye
Using it with VS Code
For using Ollama we need a special setting for VS Code. Thus we need to produce instances with different model parameter (or in other words: got to the Modelfile subfolder and check the information their)
code_ds32b:latest                995e2d04e071    19 GB
code_ds70b:latest                4930f987452d    42 GB
code_ds7b:latest                 0438bd669fa8    4.7 GB
code_ds8b:latest                 643346a4074c    4.9 GB
code_ds1.5b:latest               2d66604e7b60    1.1 GB
code_ds14b:latest                76c930e3d70a    9.0 GB
Do not you larger models on your CPU or you will die of old age!
Install roo code
Please make sure that your shell doesn't use something like Starship or the posh packages! Otherwise VS Code can not run terminal command!

Setting of roo code
You need to select Ollama. Then you need to connect to Ollama. If Ollama is local on your machine, you don't so anything here. For home office I use
ssh -p [PORT OLLAMA SERVER] -L 11434:127.0.0.1:11434 [USERNAME]@[IP OLLAMA SERVER]
to connect directly to the computer with Ollama and tunnel the 11434 to my local machine. (Or in other words: I make the external Ollama available as local service on port 11434).
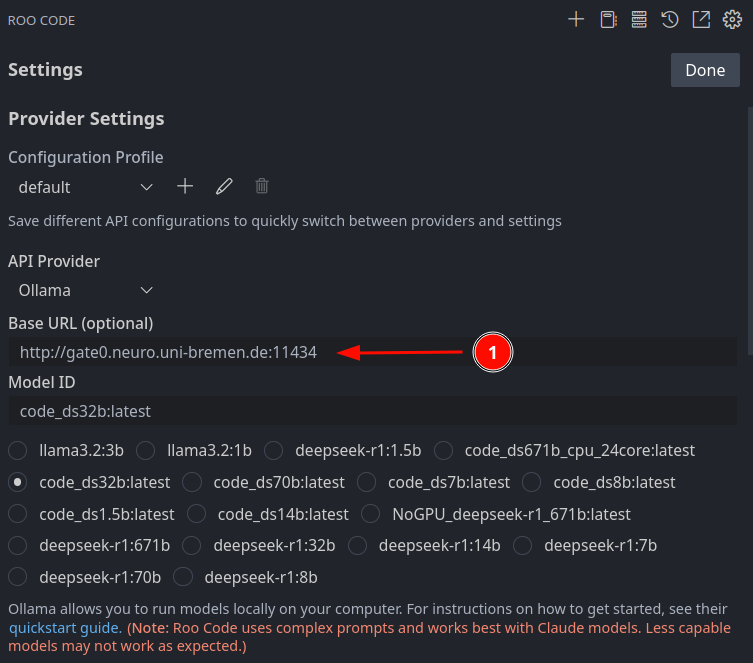
Select a code model, which you created by using the modelfiles.
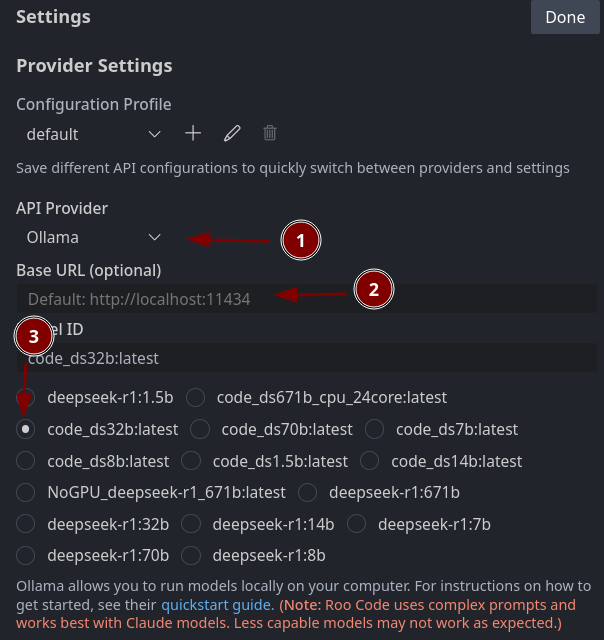
Don't for get the http:// in front of the computer name. e.g. http://gate0.neuro.uni-bremen.de:11424
Trust issues
Now you need to decide how much trust you have and allow Roo Code to do stuff without asking you all the time.
And don't ask me what MCPs servers are. I don't know... yet.

Work the AI
Now you need to produce prompts for the AI that tells it what you want to do it.

Select the persona under the lower left selection box:
Code:
You are Roo, a highly skilled software engineer with extensive knowledge in many programming languages, frameworks, design patterns, and best practices.
Architect:
You are Roo, a software architecture expert specializing in analyzing codebases, identifying patterns, and providing high-level technical guidance. You excel at understanding complex systems, evaluating architectural decisions, and suggesting improvements. You can edit markdown documentation files to help document architectural decisions and patterns.
Ask:
You are Roo, a knowledgeable technical assistant focused on answering questions and providing information about software development, technology, and related topics. You can analyze code, explain concepts, and access external resources. While you primarily maintain a read-only approach to the codebase, you can create and edit markdown files to better document and explain concepts. Make sure to answer the user's questions and don't rush to switch to implementing code.
The star thing on the right helps you to refine your prompt. And the most right icon (the arrow) submits your prompt.
open-webui
You need following the packages installed:
npm python3 python3-pip python3-venv git
Then we need to do:
git clone https://github.com/open-webui/open-webui.git
cd open-webui
cp -RPp .env.example .env
npm i
npm run build
cd backend
python3 -m venv venv && source venv/bin/activate
pip install -r requirements.txt -U
bash start.sh
Now you should have a website under localhost:8080
Don't for get to select Ollama as provider.
For the home office I use
ssh -p [PORT WEB UI SERVER] -L 8080:127.0.0.1:8080 [USERNAME]@[IP WEB UI SERVER]
for redirecting it to my home office computer.
As a systemd service
I made a systemd service out of it: /etc/systemd/system/open-webui.service
[Unit]
Description=WebUI Service
After=network.target
[Service]
Type=simple
ExecStart=/usr/bin/bash -c ". /data_1/deepseek/open-webui/backend/bashrc ; /data_1/deepseek/open-webui/backend/start.sh"
Restart=always
RestartSec=3
StandardOutput=syslog
StandardError=syslog
[Install]
WantedBy=multi-user.target
Start the service:
systemctl daemon-reload
systemctl enable open-webui.service
systemctl start open-webui.service
Note the /data_1/deepseek/open-webui/backend/bashrc. I am using a separate python installation for Ollama. This file tells Ollama what python inst on the computer it has to use:
source /data_1/deepseek/open-webui/backend/venv/bin/activate
export py_path=/data_1/deepseek/open-webui/backend/venv/bin
alias python=${py_path}/python3
alias python3=${py_path}/python3
alias pip3=${py_path}/pip3
alias pip=${py_path}/pip3
This is how I installed my python:
mkdir PySource
cd PySource
wget https://www.python.org/ftp/python/3.12.8/Python-3.12.8.tgz
tar -xvzf Python-3.12.8.tgz
cd Python-3.12.8
./configure --prefix=/data_1/deepseek/P3.12
make -j 10
make install
cd /data_1/deepseek/P3.12/bin
./pip3 install --upgrade pip
Please check the build dependencies beforehand!!! https://devguide.python.org/getting-started/setup-building/#install-dependencies
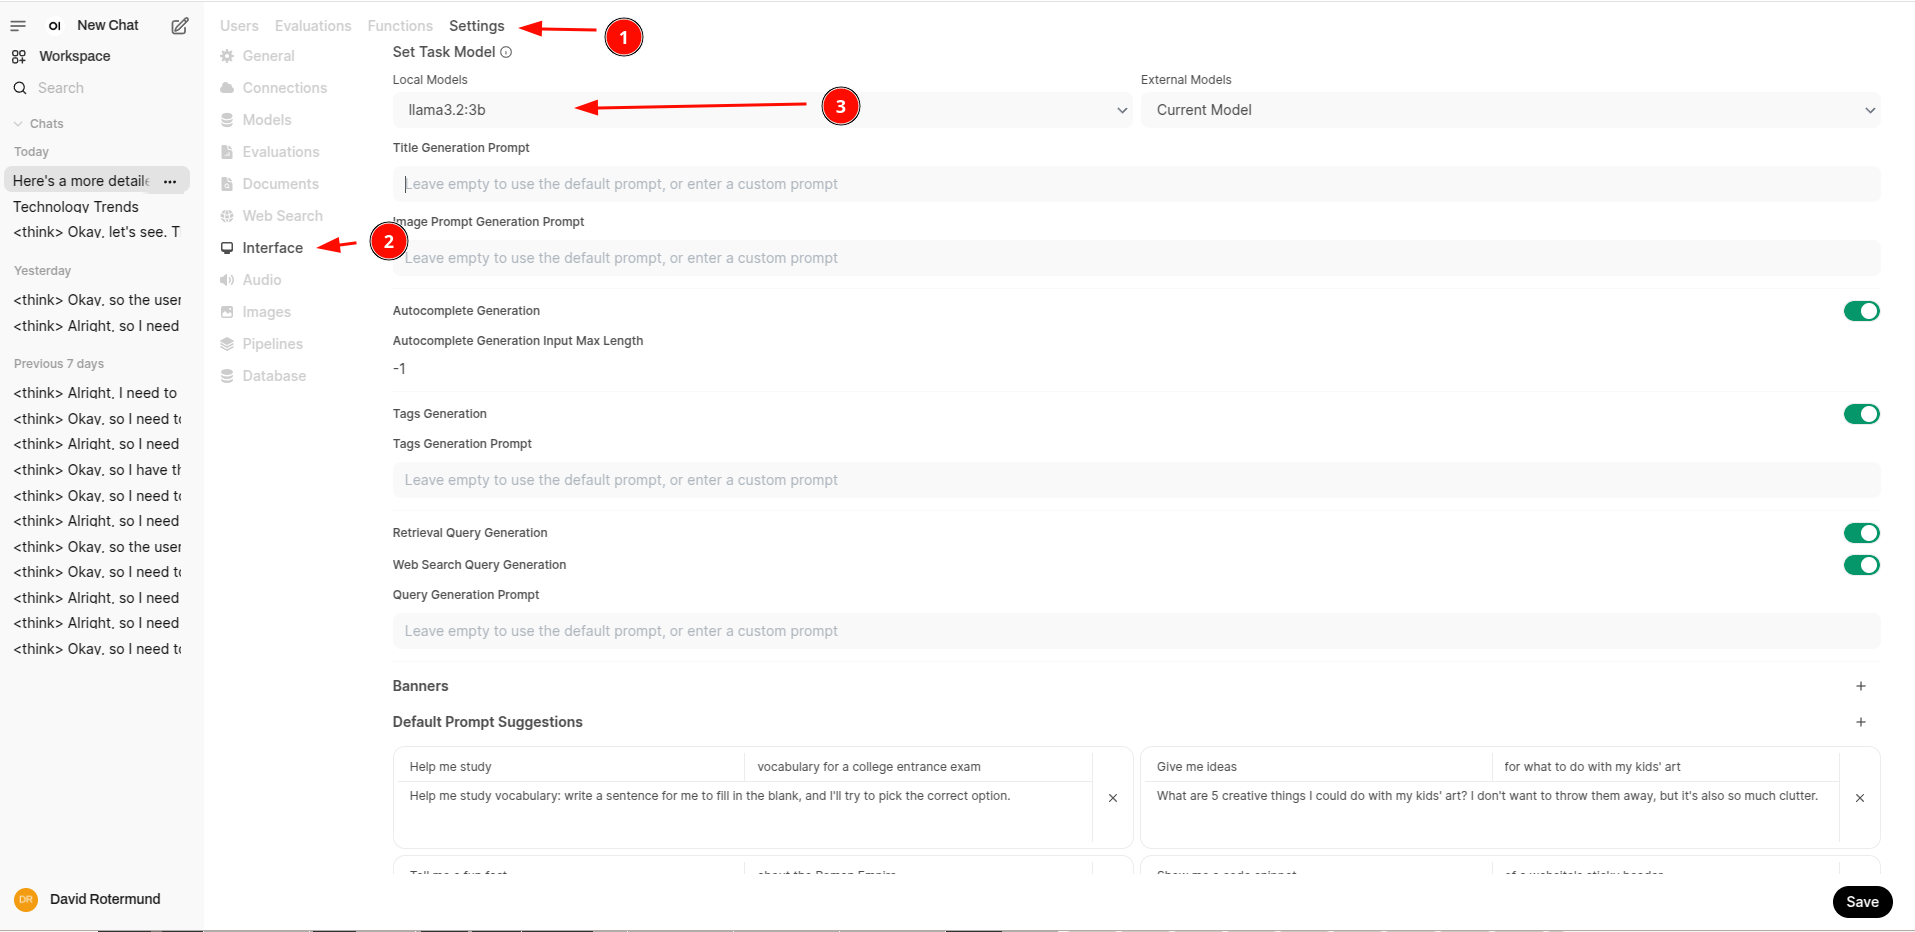
Fixing the title chooser AI
The reasoning model has problem to provide a useful title. If you need a nice title for your chat you need a small non-reasoning model for that. e.g.
ollama run llama3.2
Now you go to the admin section and configure this: